The Northern Light photography guide I wish I had at the start
2024! We're back baby!
I've taken a couple of weeks to figure out the direction where I want to go in my life. It's been quite a lot of work. I've also thought about where I want to take this Newsletter. I'm not sure, yet. Time will tell.
Now, this time, I wanted to teach you about Northern Light photography - as I know many of you want to learn about it.
In this Letter, I'll teach you how I take Northern Light photos. And how you can too.
More specifically we'll go through:
1) How to find the Northern Lights
2) The Gear you need
3) The Setting to use
4) The Compositions you could use
Let’s start, my friends.

1) How to find the Northern Lights
This part could be complicated. But let's keep it simple. :)
What you need to do to see the Northern Lights - is:
1) Be in The North
2) Have a forecast - or an app - to monitor the possibility of the Lights
3) Find a location with as less light pollution as possible
4) Have clear skies
That's it.
Being in the North
Now, you might not be living in the very North, like I do.
But - you could have a chance to see them quite south too.
As an example, they were spotted in Switzerland last autumn. And Greece - and Italy, I believe.
They've also been spotted in Southern India, The Caribbean - and even the Sahara. But by no means is this common.
The Lights in Sahara were most recently seen on February 4, 1872. So... it's possible. :D
The Lights in Japan are more common than that, though. They were seen in Japan last year too. But the previous time from that was 2003.
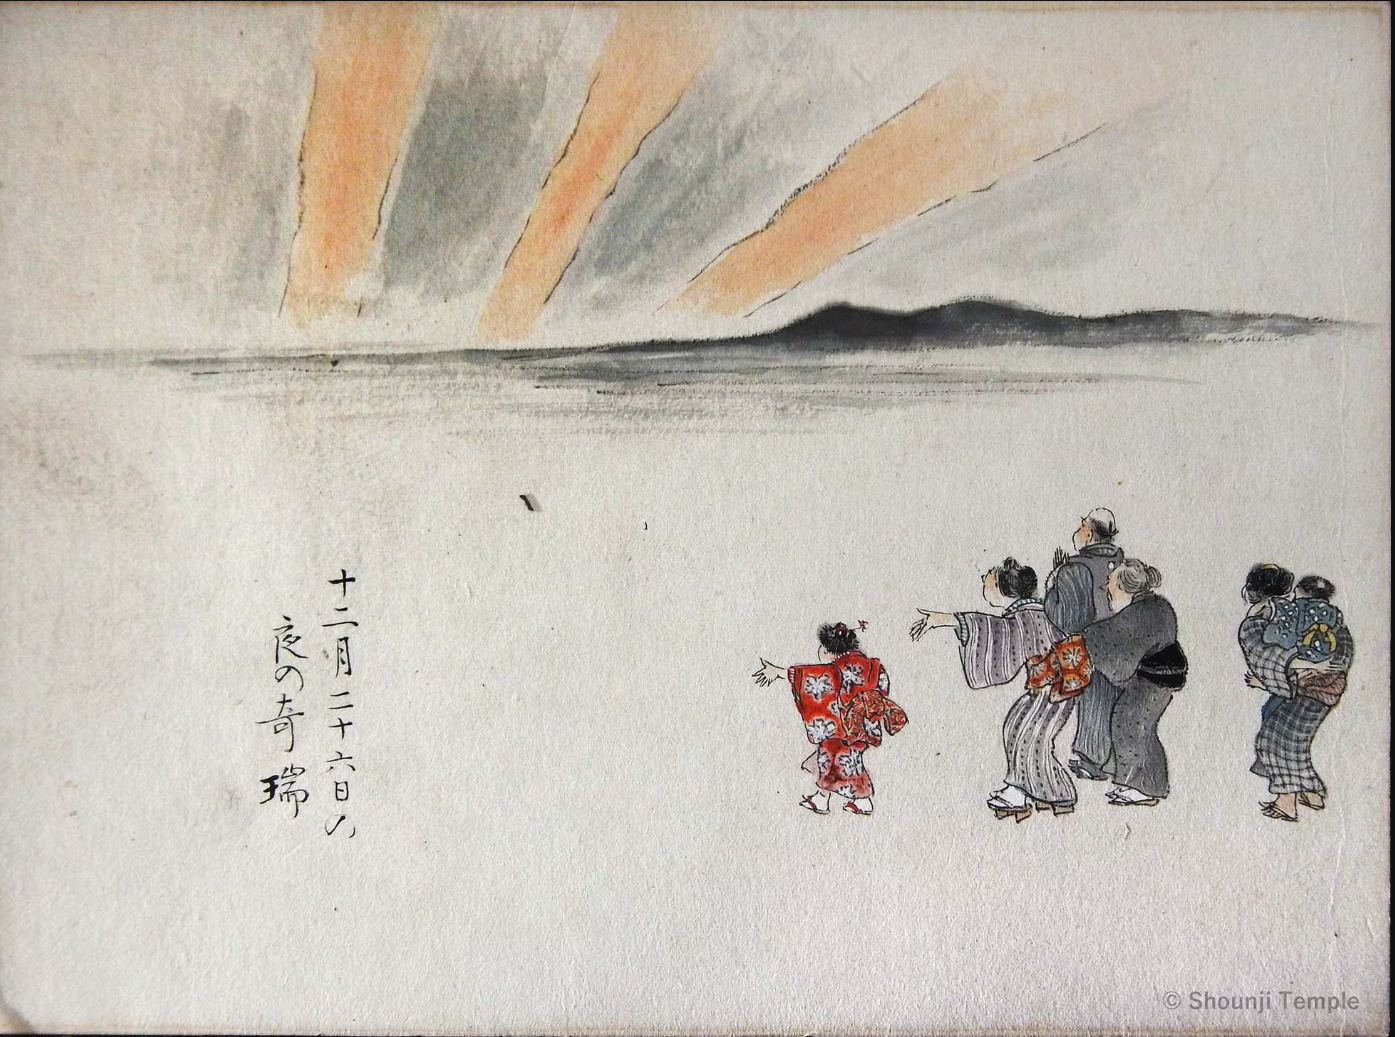
This is an impression of the Lights seen in Okazaki, Japan in 1872. Artwork reproduced with courtesy of Templo Shounji.
But if you are somewhere in Northern America, Central Europe, or Central Asia, you could have the possibility to see them a few times a year. Especially now that we're soon about to reach maximum sun activity.
Have a forecast
I use 2 different forecasts. 1 is more simple, 1 is more complicated.
The easy one is an app called Aurora. It can be found on the App Store and Google Play Store.
It tells you what's the chance to see the Auroras. You don't necessarily need to understand anything about the Spaceweather with this.
If you're a new one to space weather, I recommend this for you.
If you've already photographed the Northern Lights a bit, try checking out spaceweatherlive.com.
It has more graphs and I trust it more than any other space weather forecast.
But it's a learning curve to understand it.
But basically, you want the graphs to be yellow or red. Then it means a super good chance to see the Auroras.
They have an app too, it's called SpaceWeatherLive.
But, keep in mind - these both are forecasts.
They never guarantee Auroras for you. Nor do they guarantee there can't be Auroras.
The "easy app" has said there's a 0% chance to see Auroras. Yet, I saw some.
The only way to know for sure is to head out and see for yourself. But use these tools to calculate whether it is worth the time to go out. :)
Location with less light pollution
It is recommended, that you go to a spot at least 15km away from the nearest streetlights.
Sound easy? Yeah, no, that's a difficult task. I've done it like... once?
The darker it is where you are, the more powerful the Lights look. And the easier it is to see them.
But - oftentimes I just photograph them near my home. And there are street lights 500 metres away. It works fine. But it's not perfect.
But aim to find a dark place overall. You can search for good spots at a website like: https://www.lightpollutionmap.info/.
Have clear skies
I guess this is quite simple.
If the sky is cloudy, you'll not see any Lights.
The Lights are above the clouds.
But - this is not to say you always need a totally clear sky.
In fact, some like it more if there are some clouds in the photo. It gives the photo some mood.
Often I head out if it is at least half-cloudy.
If the forecast is strong, then I head out when it's even more cloudy.
Again, remember, the normal forecasts are forecasts too. They can show it's cloudy - but in reality - it can be clear.
Check this out yourself. If photographing near your home, just have a quick look outside.
2) The Gear you need
Thankfully, this part is quite simple. You don’t need a lot of different gear.
There are 3 main things you need:
A camera
A lens
And a tripod.
Now, of course, there are certain things in cameras and lenses you should look for. Let’s start with the camera.
It’s best if your camera body is a full-frame camera. This allows the camera to get more light into its sensor. This results in you getting to have better settings - which we’ll dive deep into later on.
So a full-frame camera is ideal for this. I use the Sony a7 III. It also has a great dynamic range. That helps a lot with the editing side of things.
Dynamic range is how much detail can you recover from the dark and bright areas of your photos.
Some cameras are better at this, some worse.
But if you expose your photos correctly, it’s not as big of a deal.
For now, focus on having a camera with a full-frame sensor, if possible. APS-C might be fine - but it won’t be as good as a full-frame image.
Lenses
The lens you use should have as small of an F-stop number as possible. I use Laowa 15mm F/2 for my Northern Light photos. It’s awesome. Any lens that has less than F/4 should work well.
I’d recommend the wider the lens the better. Rarely do you feel a lens is “too wide” when photographing the night sky.
I have the 15mm, and I wish I had even a wider one a lot of the time.
We could say 16mm or less is ideal. But you can certainly photograph with a tighter lens too. It’ll just give a different kind of a look to photos. :)
The tripod
You need a tripod, as you need a long shutter speed. You can’t hold the camera as steady as necessary at night. There’ll be movement in your photos - and that results in blurry photos.
I don’t have specific recommendations for a tripod. But I’d say don’t have the cheapest tripod out there - especially if you have expensive camera gear.
You want to invest in a tripod that stays still - even if it’s windy. The heavier it is, the better, in theory. But a lighter one is easier to travel with. So find a compromise that works for you. I have a travel tripod - which is quite light. But it doesn’t work at the heaviest winds. So it also depends on the conditions you’d be using it in.
Great, you’re good to go gear-wise. Now, let’s talk about the settings.
3) Settings
1st of all, you want to shoot everything in Manual. Have manual focus - and settings. This is that you can control everything going on - and that you get the look you want. A camera with auto settings at night is a recipe for a nightmare.
A camera is confused and doesn’t work well on Auto at night. Don’t use it, trust me.
Let’s start with the F-stop.
F-stop
As I mentioned earlier, the smaller the F-stop, the better. This allows the sensor to get more light - and that will allow you to have a smaller ISO.
The smaller the F-stop, the less of the photo will be in focus. That is why, you must think about whether you want to focus on the sky - or the foreground.
Or do you want to focus stack 2 or more photos in the post?
Focus stacking means stacking multiple in-focus images to create a single focused image.
This can be done in Adobe Photoshop. But it is not necessary.
Often, daylight scenes I shoot from F/8-F/11 (of course depending a lot on the scene). But at night you can’t do this - as otherwise, you’ll not get enough light.
So - if you want to have everything in focus, focus stacking is a must.
ISO
Have it as small as possible as well. But oftentimes, you’ll need to go to at least ISO 3200.
The lower your ISO, the better quality image you’ll get. And the less grain there’ll be.
But be careful. Don’t underexpose too much. I used to make that mistake.
I had to brighten everything in the post - resulting in a worse-quality image.
Be brave using the ISO - ESPECIALLY when you have a full-frame camera.
The cameras nowadays are so good, that you don’t need to worry too much about the ISO. Especially with TopazAI and Lightroom DeNoise being there to remove the extra noise.
The Northern Lights can be very bright. The brightness of them changes. And the speed. You want to be constantly checking the situation your settings are correct.
If you’re unsure, always underexpose. It’s always a safer bet. It’s what I do too.
But the ISO value depends a lot on 2 things.
The F-stop - and
The shutter speed.
The ISO is something you often decide as the last thing. I, unfortunately, can’t give you an exact value. This depends on those 2 factors. And they depend on:
The light pollution (how bright is it where you’re photographing?) - and
The brightness of the Northern Lights
As a rule of thumb: ISO 3200 with most cameras is absolutely fine to use. Many cameras are even higher.
I used ISO 12800 to photograph recently (as I was moving something moving. ;) And this was totally fine as I used Lightroom DeNoise to get rid of the extra noise.)
Now, let’s talk about shutter speed.
Shutter speed
You want the Northern Lights to appear sharp. You don’t want them to look like something I call “smashed potatoes”. By that I mean just it looking like a big green mess.
When you look at my 1st Northern Light photos, they were exactly that. Smashed potatoes. I only realized what I had “cooked” after a year or 2 from starting to photograph them. And changing the shutter speed changed everything for me.
As a rule, never have the shutter speed over 10 seconds when photographing the Lights. You’ll only gain smashed potatoes by doing that. I know when shooting the Milky Way, many often use longer than 10 seconds. But that’s different. This is us focusing on the Northern Lights. :)
The faster the Northern Lights are going, the faster your shutter speed has to be.
Often I photograph them between 1-5 seconds. But when the Lights are going crazy, even a faster shutter speed can be needed.
Don’t know what to go with? Just take a sample photo of them. Do they appear like smashed potatoes? Is there motion blur? If not, you probably have settings nailed down. If they do, change it up. :)
Then, let’s talk focus.
Focus
Autofocus doesn’t work at night. Don’t try to use it. Switch to manual focus.
But where and how to focus on something?
Let’s talk about that.
You want to ask yourself “What do I want to focus on?” - or even better: “What’s the thing I want someone watching this photo to focus on?”
If it’s the sky, search for the brightest star in the sky. Zoom into it, digitally. Adjust your focus ring until it’s sharp.
(This digital zoom can be found somewhere in your settings, depending on the camera. I have set the zoom to a custom button for faster access.)
If it’s something in the foreground, light the subject with a headlamp. Adjust the focus ring until it’s sharp.
Now you’re good to go. But let’s chat about composition and how to actually make good Northern Light photos.
4) Composition Tips for Northern Lights
The best photos of the Northern Lights, in my opinion, are when there’s something else than the sky. Often it’s not enough to just point the camera in the sky and wish for the best.
You need to have a good composition.
But this can be difficult to figure out - because when there are Northern Lights, you're in a hurry to get the shot.
Let’s go through some compositions I use in my Northern Light photos. I always have these in mind, so I can take photos faster.
A human in the foreground
This is one of my favourite ways of photographing anything. Why to use this with the Northern Lights?
This makes the Northern Lights more powerful - which is often the story you want to tell.
It’s an “easy” subject, and you always have someone to be in the photo. (Because you can be in it yourself).
It gives you a better memory of the moment. You can see yourself (or someone you care about) under the Northern Lights.
I highly recommend trying this out.
A photo I made in 2023. The footprints on the ground lead your eye to the human. The human watches the Northern Lights - and this creates a leading line. When you watch the human, you start to watch the Lights.
Something with leading lines
Leading lines are lines that lead to our subject. Let’s take this photo above as an example. It has a person, but there’s this line (the footprints) leading to the person. The person on the other hand is watching the Northern Lights - creating an invisible leading line.
If you want a visible leading line, consider having a headlamp on in the photo.

Here the street leads your eye to the human. The human's headlamp takes you to the sky. See - I use the person and the leading lines often together.
In some scenarios, the Lights themselves can serve as the leading lines.

It's the most wonderful time of the year - photographed in 2020. Made of 2 photos. Here the Lights lead the eye to the Santa Claus. He's the main subject.
Framing
Frame the Northern Lights with something. Often this can be branches, trees or perhaps two people watching the Northern Lights.

A photo I made in 2018. It has the branches framing both me - and the Northern Lights. The Lights could be sharper. Here they're reminding me a bit of the smashed potatoes.
It all depends on the story you want to tell.
But don’t just point at the sky. Everyone can take a photo like that.
Most importantly, ask yourself “What do I want to take a photo of exactly? What am I photographing? What’s the story I want to tell?”
When you ask these questions, your brain will start to find answers to them.
Last words
Okay, so now you know how to find Auroras, the gear you need, the settings and some composition ideas.
I hope you found this helpful. If you did, please consider sharing it with a friend.
If you were forwarded, you can subscribe to receive more tips here:
I hope you've had a great start to 2024.
And welcome to everyone new. Lots of you joined the Newsletter lately. Thank you - I hope you enjoy your stay here. :)
See you next Saturday,
Hugo